- How do I add text
to my images and move the text around to exactly
where I want it on the image?
- How do I add a
watermark to my images?
|
We provide you with many tools to modify
your images. Keep in mind, however, that our programs are not
a substitute for an image editor.
There may be times when you have an image
to which you want to add text, another image, or a watermark. You
may want to move the text or image around and place it on certain
parts of your original image (e.g., put two images side by size,
one overlapping part of another, etc.). We created a tool to
allow you to do this kind of image editing through your website.
This tool allows you to make a composite image, which simply
means that you make one image out of several images.
In order to make multiple images, you must
first upload the one image you want to use as your base image.
That is, upload the image to which you want to add the additional
text or images.
To Upload your Base Picture
> Click on the Manage Photos icon at the top
> Under the Images for Use in Pages with the Page Editors
section, click on the Upload Images to Page Gallery link
> Click on Browse, find the picture in your computer and then
click on the Upload Files link at the bottom
> Click on the Return to Photo Management link to get back to
the Image Management section (or click on the Manage Photos icon
at the top and then click on the Manage Current Page Gallery
Images link)
Once you have your picture uploaded, then
you can begin to use the Composite Feature
Accessing the Composite Tool
Feature
> Click on the Manage Photos icon at the top
> Click on the Manage Current Page Gallery Images link
> Find your base image in the list and then click on the Add
Text / Composite / Watermark link next to the image

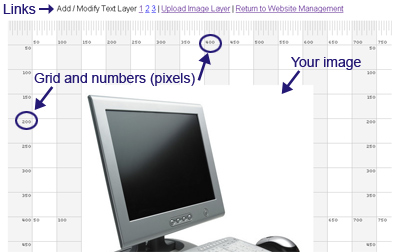
When you click on that link, you will see
your base image on a grid. The numbers on the grid are pixels (not
centimeters or inches). These numbers tell you the size of your
picture. A good picture size for your website is about 500 x 500
pixels. There are several links above the grid.
- Add / Modify Text Layer 1 2
3 - 1, 2, and 3 are linked to the Image
Composite Text Layer section. This allows you to create
text to add to your base image. The 1, 2, and 3 mean that
you can have three different text layers. That is, you
can have three different words or phrases that are one
image, which you can move around and place on your base
image.
- Upload Image Layer
- If you have an additional image that you want to add to
this base image, click on this link to upload that image.
You can upload up to two additional images to add to this
base image.
- Return to Website
Management - Clicking on this link will take
you back to the Website Management Console where you can
see all the icons at the top.
If you want to create TEXT to add to
your image, look for the
Add / Modify Text Layer 1 2 3 (see the top of the graphic above)
and click on the 1, 2, or 3, which will take you to the Image
Composite Text Layer section.
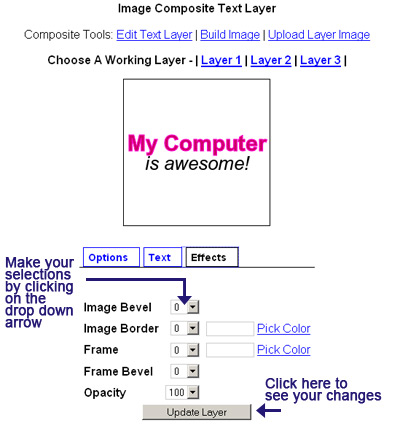
Image Composite Text Layer - Under the
Options tab:
- Select the image size you want to
create from the drop down (see the information in red in
the below graphic)
- Select to either use a color
background or a transparent background (see the
information in green in the below graphic). If you use a
color, then there will be color behind your text. If you
use transparent, then there will be no color behind your
text. If you want to have a color, click on the Pick
Color link and you will see a color chart pop up. When
you click on a color from the color chart, the system
will automatically add that color to the color section. (Note
that in our example, we are selecting transparent)

Next click on the Text tab - Under the
Text tab:
- Type in the text you want to appear
under the Top Line Text, Middle Line Text and/or Bottom
Line Text
- For which ever line you typed text,
select a Size, Color and Font
- Click on Update Layer to see your text
- If you do not like the way the text
appears, make your changes and click on Update Later
again

Click on the Effects Tab - Under the
Effects tab:
- Note that Image Bevel, Image Border,
Frame, and Frame Bevel all affect the entire IMAGE and
not just the text. Thus, if you select to have
transparent text, then those features will not work.
- You can use Opacity and transparent
text. If
you want to make your own watermark, you should use the Opacity feature
because this is what will make the text appear to be semi-transparent.
Your watermark text can be whatever you want. Many people
simply write the url of their website.
- Make your changes and then click on
the Update Later button to see how your image looks
When you like the way your
image appears, click on the Build Image link at the top and the
system will add the text you created to your base image.


After the system adds the text,
you can then drag the text around and placing it
wherever you want it on the base image. To
drag the text around, place your cursor over
the text and you will see that the cursor turns into a four way
arrow. Hold down your left mouse button (or right if your mouse
is set up for right hand use), and move the text wherever you
want it on the page. You can also move your base image around in
the same way.
You can also resize the text
and/or the base image. To resize,
put your cursor on the image you want to resize, hold down the
Shift key on your keyboard, and then move your mouse in whatever
direction you want to size the image.
If you want to add another IMAGE to add
to your image, click on
the Upload Image Layer link at the top. The system will allow you
to upload up to two images that you can add into your base image.
Click Browse, find the image in your computer, click on Open, and
then click on Upload Image. Your image will appear on the page
when uploaded. Click on the Build Composite Image link at the top
to return back to making your Composite image.
If
you want to upload a watermark image that you created, you upload the image in this section.

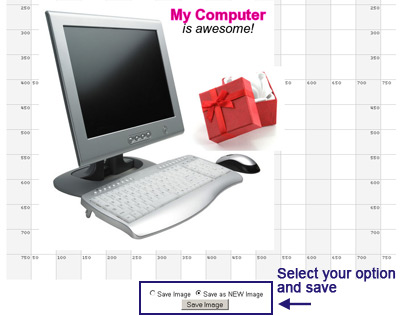
You will see that the image
you uploaded is now on the grid. You can drag all the images
around and place them as you want them to appear in the finished
image. You can also resize them as needed.
When you have the
image the way you want, scroll down below the grid.
You can select to either Save Image or Save as NEW Image. Pick
the option you want and click on the Save Image button.
The system will add your new image to your
Image Management Section (i.e., the section under Manage Photos
>> Manage Current Page Gallery Images).
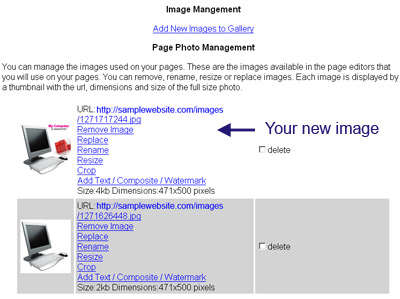
You can then use this image wherever you
want on your website.
|