|
Uploading Images to
Gallery
> Click on the Manage Photos icon at
the top
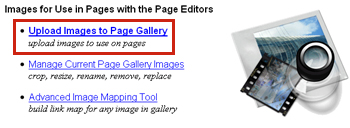
> Scroll down to the Images for Use in Pages with the Page
Editors
> To upload images to your
gallery, click on the Upload Images to Page Gallery link
> To manage the images currently
in the gallery, click on the Manage Current Page Gallery Images
NOTE: If you want the pictures to appear in your
Shopping Cart, then you must upload
those pictures through your Shopping Cart.
If you
want to upload images to regular pages such as Home, About Us,
etc., you will first need to upload the images to your gallery.
Once you upload the pictures, then you can click on the Edit
Pages icon, click Edit for the page you want to change, and then
click on the Camera icon in the editor. From there you can select
the pictures to add into your pages. Click here to learn more.
The system will automatically
size down images over 600 pixels to fit into your pages. You can
resize the image further using the Resize Option under Manage Current Page Gallery Images. You can also use the Editor to squish the image
down. Please note that squishing the image does not actually
resize the image - it just makes it appear smaller on your
website. If at all possible, you should resize the image
rather than squishing it down. To learn why, please scroll
down to the "Why should I resize my images" section of
this help page.
To Upload Images to
the Gallery
To upload images, first look
on the main menu for the Manage Photos icon 
Next click on the Upload
Images to Page Gallery link.
Next you will see a form you
are probably already familiar with.
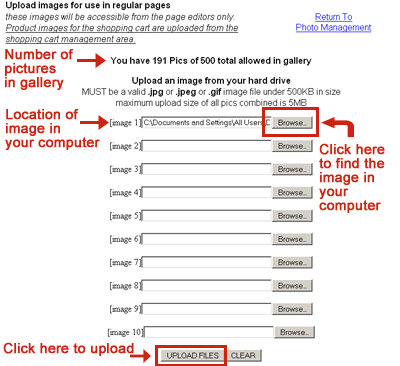
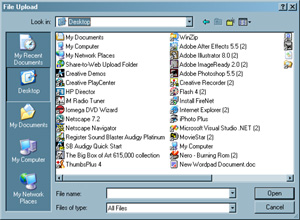
Clicking the Browse Button
will pop up a menu of the files on your computer. The menu will
look something like the window below. Note: What you see will
depend on your Operating System. Find the file you want to upload,
click on the file to select it, and then click Open. When you
click on Open, the location of the image in your computer will be
inserted into the space next to Image 1 as show in the previous
image. Repeat the process for other images.
When you find the files you
want to upload, click on the Upload Files button. The system will
return you back to this same screen.
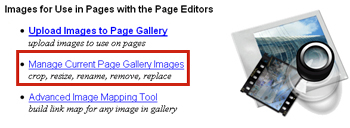
To Manage Images in
the Gallery
To manage your photos, you can
either click on the Return to Photo Management link or click on
the Manage Photos icon at the top and select Manage Current Page
Gallery Images.
In the Page Photo Management
section, you will see a listing of your current images.
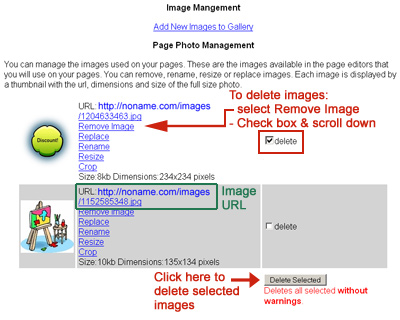
From this Page Photo
Management list, you can:
Remove
Image - allows you to delete the single
image
Delete a
Group of selected images - check the box
next to delete, scroll down to the bottom, and then click
on the Delete Selected button
Replace
Image - allows you to replace the current
image with a new image. This is useful if you have this
image on another page and do not want to go through the
trouble of deleting the current image and reinserting a
new image.
Rename
Image - allows you to rename the image
using either text or numbers. NOTE: renaming a picture makes it a
new picture. If you are currently using the
image on a page, you will see a warning message. If you
rename the image here, the system will NOT recognize this
change. This means you will need to go back to that page
and replace that picture with the old name with this
picture with the new name.
Resize
Image - allows you to resize your images.
If you want a picture to be 200 pixels across but do not
know the appropriate height, then click in the Width box,
type in 200, and click on Submit. The system will pick
the correct height for you. NOTE: If you are currently using this image
on your website, the system will replace that image with
your new resized image.
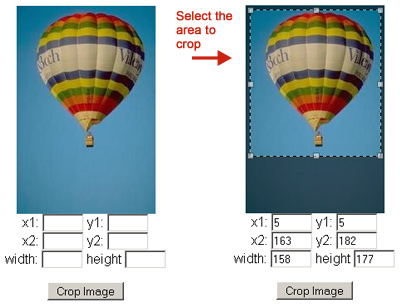
Crop Image
- allows you to crop your image by selecting the area to
crop. Put your cursor in the part of the image where you
want to start to crop (e.g., in the upper left hand
corner), hold down your mouse and drag until you selected
the area you want to crop. If you selected the wrong part,
then click again and try again. Then click on the Crop
Image button. NOTE: If you are currently using this image
on your website, the system will replace that image with
your new cropped image.
Why should I resize
my images?
Images must be under 500kb in
file size to be uploaded to the gallery. If the images are too
large, your viewers will have to wait a long time before the
image will download on their computer.
Download
and Upload Time for ONE 500kb File
|
Speed
|
Upload
Time
(the length of time it takes for you to get the file to
our system)
|
Download
Time
(the length of time it takes for your customer to see the
picture)
|
| Dial Up: 28.8
Kbps |
7 minutes |
2 minutes and 18 seconds |
| Dial Up: 56 Kbps |
4 minutes |
1 minute and 11 seconds |
| DSL or Cable: 256 Kbps |
50 seconds |
15 seconds |
| DSL or Cable: 1.544 Mbps |
6 seconds |
2 seconds |
| DSL or Cable: 2 Mbps |
3 seconds |
1 seconds |
Those are the numbers for just
one image. If you have multiple images on your website page, it
will take even longer.
Why
is there such a large difference for upload time and download
time? ISPs do not give
you the same time for uploading as they do for downloading. You
can download faster than you can upload. So, the dial up speed of
28.8kbps is only download speed; not upload. Upload speed is
usually half the speed of download. For cable providers, it's
even worse. In December 2009, Comcast offered:
Package
|
Download
/ Upload
|
| Performance |
12 Mbps / 2 Mbps |
| Blast |
16 Mbps / 2 Mbps |
| Ultra |
22 Mbps / 5 Mbps |
| Extreme 50 |
50 Mbps / 10 Mbps |
Keep in mind that these high
speed packages were offered in limited areas. Many, many people
are still using dial up and satellite connections (which are just
as fast as dial up).
For help on managing images in
your own computer and software suggestions read the Graphics Page.
|