|
Rental or
Availability Calendar
The Rental or Availability Calendar allows
you to add rooms, properties, tools, or services to a Calendar
and then mark them as being Available, Pending, or Reserved. If
you rent out vacation property, for example, you can mark certain
dates as available, pending or reserved. Similarly, if you
provide services where you are generally reserved for the day,
then you can use this calendar to show your availability for
certain days.
To manage the Rental or
Availability Calendar:
- Click on the Manage Programs icon at
the top
- Click on the Manage Rental or
Availability Calendar link which will take you to the
main Availability & Rental Calendar Management
section.
Inclusion codes to use:
Check the Availability & Rental
Calendar Management page for the inclusion codes.
- There is an inclusion code available
for a full listing where all the rooms or services
will be displayed: %%rentalcal-default%%
- There is also an inclusion code for
each room or service: these inclusion codes
change based on the name of your room
Who can use the Calendar Program?
This Calendar program can be used by those
who provide vacation rentals or those who run a bed and breakfast.
This Calendar program can also be used by those who have a car
rental service (e.g., classic car rental, exotic car rental and
chauffeur rental services).
Calendar Colors and Settings
To use the Calendar program, you must first
configure the settings. To configure the settings,
click on the Manage Programs icon, click on the Manage Rental or
Availability Calendar link, and then click on the Availability
Calendar Colors & Settings link.
1) You
should select a display style. There are
two options: "Full list of all listings" and "Small
calendars for each listing":
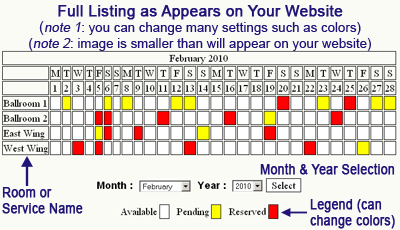
Examples: Full List of All Listings
(Note: your look may be different depending on the rest
of your settings)
|
The below look
with the white, yellow and red is the default look. So,
if you do not make any changes, the calendar on your
website will look like the one below (except bigger).
Click here to see other
possible looks for Full List Display Style
|
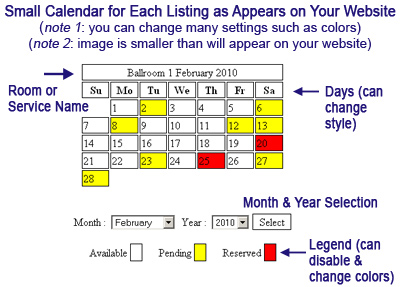
Examples: Small Calendar for Each
Listing
(Note: your look may be different depending on the rest
of your settings)
|
The below look
with the white, yellow and red is the default look. So,
if you do not make any changes, the Small Calendar on
your website will look like the one below (except bigger).
Notice that the
example below is for one of the rooms, Ballroom 1,
that is listed in the above Full Listing. You know this
is Ballroom 1 because the name is listed right next to
the month and year.
Click here to see other
possible looks for Small Calendar Display Style
|
You can see from the few
examples listed above that you can fully customize the
calendar to match the colors of your website.
If you are
using the Small Calendars
You can select to
include the Color Legend so that your customers can
see the meaning of the different colors. The above
example includes the color legend.
You can select the
Day Display format. There are several options. The
default option is the Su Mo Tu, etc. option.
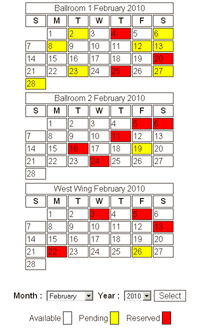
If you want every small
calendar to appear on one page like the example below, then
you should select the "Small calendars for each listing"
option and then use the %%rentalcal-default%% inclusion code.
2) Select
a Font, Text Color and Link Color.
Select the font you want for your calendar. The font changes
for both the Full Listing and the Small Calendars. You can
also change the Text Color and the Link Color. The Text
Color is the color of the text on the calendar
including the month, the dates, and the names of the rooms or
services. The Link Color is the
color of the link for the name of the room or service. That
is, when you add a new room or service, you can make that
room linkable to a page so that someone can click on that
room name and see a full description. Note:
The Link Color only applies to the Full
List display style because the Small Calendars listing
does not have any links.
3) Select
a Text Size. Select the text size you want for
your calendar. After you make your selection, make sure you
double check the settings on your website to make sure that
the calendar still fits on the page. The extra large text
size, for example, may not be appropriate on the Full List
display style because it may stretch out your page (given
that all 28-31 days are listed on the calendar) depending on
the page template or layout you select. But, it may be more
appropriate if you are using the Small Calendars style.
4) Select
Colors for Display Calendar. Here you can
select the colors for just about everything. Pick the colors
that will match the look of your website. You can see the
default settings in the two calendars listed above.
5) Click
on the Update Settings button when you finish.
6) Go
to your website and double check your work. To
see the changes, click on the Website Home icon at the top.
Then click on the page where you added your availability
calendar program.
Add New Listing
To add a New Listing or new
service, click on the Add New Listing Link. Type in the listing
name and click on the Submit button. You will also see your
current listings listed.
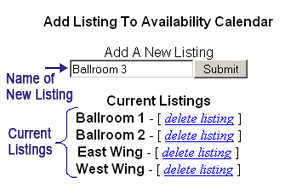
Once you add your listing, the
system will add this listing to the listing of Current Listings
in the main Availability & Rental Calendar Management section.
Updating the
Availability Calendar
Once you add your Listings,
you must now tell your customers whether the particular Listings
are Available, Pending or Reserved for certain dates.
Click on the Update
Availability Calendar link in the main Availability & Rental
Calendar Management section. You will see your calendar. The page
includes all your Listings. You can select the whether the
particular property/service is available, pending or reserved for
a specific date.
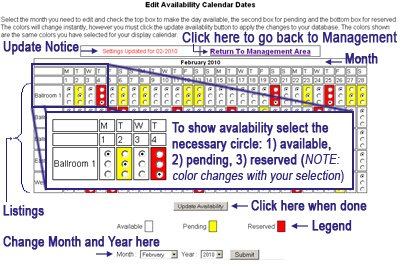
To make the available, pending
or reserved selection, find the Listing, find the date in the
Calendar, and then click on the appropriate circle. The top
circle is available, the center circle is pending
and the third circle means reserved. As you click on the
circles, the color in the Calendar will change to reflect your
selection.

When you finish making your
selections, click on the Update Availability button below the
calendar. Then click on the Return to Management Area link to
return back to the Main Management section.
If you need to
make changes to a different month, select the Month
from the drop down and click on the Submit button. Select a
different Year from the drop down if you need to make changes to
a different year and click on the Submit button.

Adding a Hyperlink
to a Listing
There may be times when you
want to provide more information about a particular Listing. If
you rent several houses, for example, you may want people to be
able to click on one of the houses to see more information.
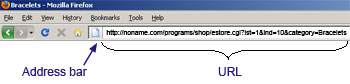
To create this hyperlink,
first you must get the url that you want people to go to when
they click on the text. For example, if you want people to go to
Google when they click on the Ballroom 1 link, first you need to
get the url for Google which is: https://google.com. You can go to
the address bar of your browser to find the url.
If you want to link to an
internal url (i.e., one in your website), the you can get the url
by clicking on the Edit Pages icon and then finding the url in
the list of pages.
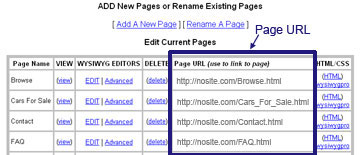
Once you find the url,
highlight copy the full url.
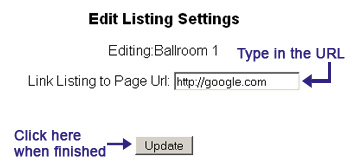
Go back to your Availability
& Rental Calendar Management section, find the Listing under
the Current Listings section, and click on the Edit link. Click
in the box next to Link Listing to Page Url and paste in the url
you copied. Click on Update to save your settings.
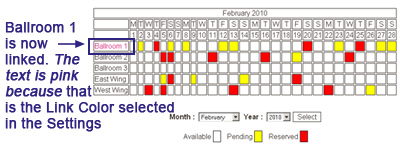
Note:
this hyperlink will only work on the Full List Display option
setting. Notice that in the example below, Ballroom 1 is now
linked. It appears pink because we set a different color for the
link color and the color we selected was a shade of pink. You can
change the link color by clicking on the Availability Calendar
Colors & Settings link and then changing the color for the
Link Color (see step 2 above).
Deleting a Listing
To delete a Current Listing,
find the Listing under the Current Listings section in the main
Availability & Rental Calendar Management section (the one
you see when you click on the Manage Rental or Availability
Calendar link under Manage Programs). When you find the listing,
look across and click on the Delete link. Confirm that you would
like to remove the listing.
|