|
Building A Sample
Template
We will take you step by step
the process to build a basic template and install it in your
website. At the end of this tutorial you can download the files
for the template we have explained. You can install them in your
website and see how the process works.
Step #1 Building The
page.
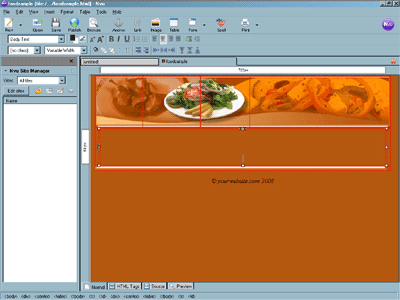
For our sample we have built
an image of the page using photoshop and then slicing the image
into pices using Adobe Image Ready. Then using our WYSIWYG editor
we format the pices into our basic HTML page.
This is really beyond the
scope of this document since we are assuming you already know how
to build a web page from scratch.

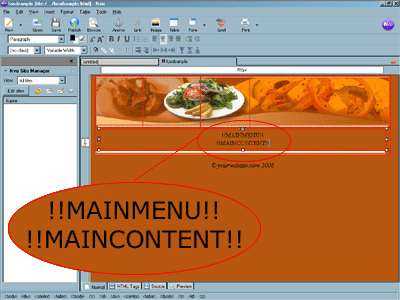
We need to add 2 items to the
main WYSIWYG page. The main content string and the main menu
string. These can be added right into the regular editor. Here we
have blown up the area so you can see it clearly.

Step # 2 Editing The
HTML
We need to adjust the paths in
our html file to work on the website, since the paths will be
different than on our home computer.
The images will be uploaded to
/images/custom/custom-000 and they will retain the same names as
in our current file.
So we can understand the code
we have renamed our images bg.gif for the main background,
tablebg.gif for the main table background, tablebottom.gif for
the bottom of the main page and the top images are top....
The last image on the top will
be where we will allow the site owner to modify the space to add
their name and logo. So that images has been named titlespace.gif
which will make it dynamic.
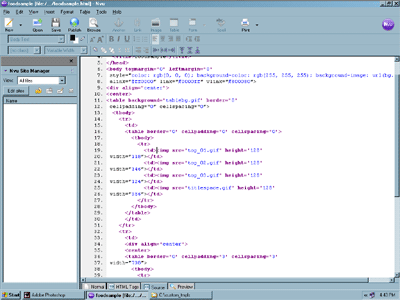
Now switching our web editor
to HTML or using any text editor we can edit the source code.

Since it is very difficult to
see the text on a thumbnail, we will post it here in plain text.
The full source code for the page looks like this.
<html>
<head>
<title>Sample Template</title>
</head>
<body background="bg.gif" bgcolor="#FFFFFF"
text="#000000"
link="#0000FF" vlink="#800080" alink="#FF0000"
topmargin="0"
leftmargin="0">
<div align="center"><center>
<table border="0" cellpadding="0"
cellspacing="0"
background="tablebg.gif">
<tr>
<td><table border="0" cellpadding="0"
cellspacing="0">
<tr>
<td><img src="top_01.gif" width="118"
height="128"></td>
<td><img src="top_02.gif" width="146"
height="128"></td>
<td><img src="top_03.gif" width="124"
height="128"></td>
<td><img src="titlespace.gif" width="356"
height="128"></td>
</tr>
</table>
</td>
</tr>
<tr>
<td><div align="center"><center><table
border="0"
cellpadding="3" cellspacing="3" width="738">
<tr>
<td align="center">!!MAINMENU!!<p>!!MAINCONTENT!!</p>
</td>
</tr>
</table>
</center></div></td>
</tr>
<tr>
<td><img src="tablebottom.gif" width="744"
height="9"></td>
</tr>
</table>
</center></div>
<p align="center"><em>© yourwebsite.com
2008</em></p>
</body>
</html>
Rather than outlining the
entire document changes we will show only the main table with the
title space. You should be able to understand the concept without
showing every change.
<table border="0"
cellpadding="0" cellspacing="0">
<tr>
<td><img src="top_01.gif"
width="118"
height="128"></td>
<td><img src="top_02.gif"
width="146"
height="128"></td>
<td><img src="top_03.gif"
width="124"
height="128"></td>
<td><img src="titlespace.gif" width="356"
height="128"></td>
</tr>
</table>
We need to change the image paths on all
the images except the titlespace which we want to be dynamic. The
images will all be in /images/custom/custom-000, so we adjust the
code below accordingly.
<table border="0" cellpadding="0"
cellspacing="0">
<tr>
<td><img src="/images/custom/custom-000/top_01.gif"
width="118"
height="128"></td>
<td><img src="/images/custom/custom-000/top_02.gif"
width="146"
height="128"></td>
<td><img src="/images/custom/custom-000/top_03.gif"
width="124"
height="128"></td>
<td><img src="!!BUSINESSLOGO!!"
width="356"
height="128"></td>
</tr>
</table>
You will notice we replaced
titlespace.gif with the replacement string !!BUSINESSLOGO!! which
will allow the site owner to modify a copy of that image. The
image in the template will remain intact and will only be used if
the site owner does not provided a modified image in the regular
site builder.
If we want the site owner to
be able to alter the link colors and text colors we will need to
replace those values also. when we built the page with our editor
we set the values as:
<body background="bg.gif"
bgcolor="#FFFFFF" text="#000000"
link="#0000FF" vlink="#800080" alink="#FF0000"
topmargin="0"
leftmargin="0">
We will take out the hex codes
and replace them with our own replacement strings.
<body background="bg.gif"
bgcolor="!!BGCOLOR!!" text="!!TEXTCOLOR!!"
link="!!LINKCOLOR!!" vlink="!!VLINKCOLOR!!"
alink="!!ALINKCOLOR!!" topmargin="0"
leftmargin="0">
That will give the site owner
the ability to change those values from their manahement console.
Our template is now complete
and ready to load on the website.
Step #3 Uploading
Files
We will need one additional
file for the upload. A simple screen capture of the finished page.
This thumbnail about 200x150 pixels will be added to the main
gallery of themed templates. We have included one in the sample
download but if you re buuilding your own you will need to make a
thumbnail or use a place holder image with a note on it.
The next step will be to
install the template code in your website. From the management
console
> Click on Page Properies
> Click on Build Custom Templates Edit / Upload Template
There will be 4 links on the
page. To upload the html, upload images, upload the thumbnail and
to view the template. Start with the image upload. You can upload
10 images at one time and up to 100 images total with a combined
max size limit of 1MB.
That is prety self explanitory,
just upload all the jpg and gif files into the directory for the
custom template. All the files that are in the directory will be
listed on the page. Check your files against the list and make
sure all the files are persent and the names are the same.
Note: Sometimes when
tranfering files from windows to unix the file names are altered
by the windows client. Windows is not cases sensitive so it has a
nasty habit of changing files names to upper or lower case. While
that type of sloppy file management works for windows, it is
totally unacceptable on the intenet and wont work on a website.
So make sure your computer did not do nasty things to yor file
names.
Next we need to install the
HTML. We have already made all the changes and all we need to do
is copy and paste the text into the form on the website
management page.
We use the copy and paste
because it will allow you to view and edit the HTML in real time
from one location.Once you have added the HTML you can click on
the View Template link. This will show you how the template will
appear on the website. If all the images are not showing or there
are some errors, then continue to edit the HTML. If it all looks
good, then upload the thumbnail to the template gallery.
You are DONE!
to change the website to the
template you have uploaded, just go to
> Page Properties
> Choose Themed Template
You will see your thumbnail on
the top of the main page. Click the change template button and
your website is now using its own custom template.
You can download and install
the template we show in this tutorial
Download The Zip File
|

