|
Customize
the Template Title
The Title Space appears at the top of
your website and appears on every page of your website (unless
you designate the page to be blank). Every template that we provide
has an area reserved for your company name (and phone number, e-mail
address or address). You can see this area under the Customize
the Template Title section. If you are using a layout,
there is no pre-made title image included. But, you can add
either your own title image using the Upload New Template Title link or select one from our gallery by clicking on
the Select Blank Image from Gallery link. There are thousands of images to choose from.
You can use this Customize the Template
Title section to add text to the image. This section does not
allow you to add your own picture on top of the current image. If
you want to add an image, such as your company logo, to this
existing title image, then you must download the
image to your computer. To do this, right click over the image
and select either Save As or Save Picture As option. Save the
picture to your computer, make the modifications using an image
editing program, then upload the image in the Upload New Template Title section.
If all you want to do is add text to your
image, you can do so in this Customize the Template Title section.
You can add 3D effects to the image as well as a Text Border to
the text.
This section has 4 steps.
STEP 1: Customize the Original
or Current Iimage or make a New image.
If you selected a template, then
the step 1 section will look similar to that below. Under Step 1,
you have three options:
- The Original Image is the image
in the first box. That is the image that matches the
template you selected.
- The Current Image is the image
in the second box. That is the image that you created (as
shown in the example it has the words My Car Website),
the image that you selected from the Blank Image Gallery, or the image you uploaded yourself.
- The Make A New Image with a
length xxx and xxx high allows you to make your own image
if you do not like the image that matches the template.
Note that there is only a certain amount of space
provided for the title space. That length is specified
and you cannot go above that length.
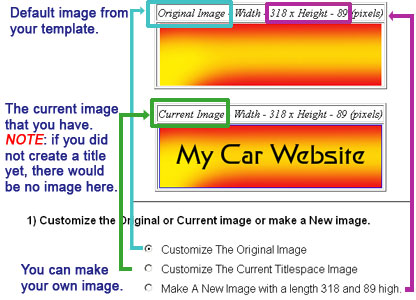
You must pick one of the three
choices. If you want to use the Original Image, then
select the Customize the Original Image option (as shown). To
select, simply click in the little circle next to the words and a
black dot will appear (as shown). If you want to customize the
image you already made by, for example, adding your phone number
below the words My Car Website, then select the Customize The
Current Titlespace Image option. Finally, if you want to replace
that title space with a plain color, then select the Make A New
Image option.
If you selected a page layout, then
the step 1 section will look similar to that below. Under Step 1,
you have two options:
- Customize The Current Titlespace
Image - Notice that in this example, there is no
image because no new image was created and no blank title
space was selected. If a title space was selected, there
would be an image in pace of the No Image section. In
this example, therefore, your only option would be to
create a new image.
- Make A New Images with A New Size
- You can use this option to make your own image.
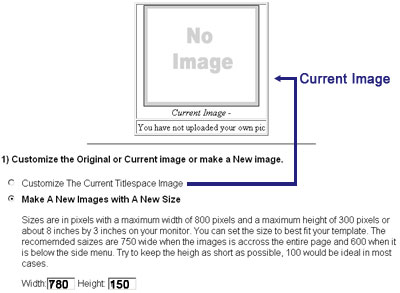
You must pick one of the two choices.
To select, simply click in the little circle next to the words
and a black dot will appear (as shown for Make a New Image with a
New Size).
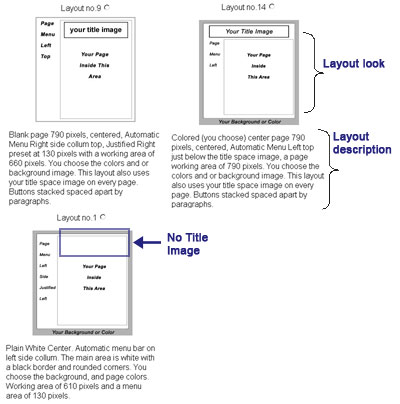
If you are using a page layout that has
the buttons below the title space (check the specifications
for your page layout where the button placement will be pretty
clear; compare Basic Page Layout number 9 with number 14), then
the best size for a title space image is between 780 and 790 for
the width and no more than 150 for the height. If you are using a
page layout that has the buttons next to the title space (see
Basic Page Layout number 9 for an example), the best size for a
title space image will depend on your button size. Usually, the
length should be no more than the working area, which is 660
pixels. The height should be no more than 150 pixels. Keep in
mind that if you want to have a title space, you must select a
layout that allows for a title space image. Not all of them have
such space (see Basic Page Layout number 1 for an example).
STEP 2: Set 3D Effects and
STEP 3: Choose the Colors
Setting 3D Effects and Choosing the Colors
must be done together because you will not be able to see some of
the 3D effects without selecting colors or, in some cases, the
system will fill the selections with white space.
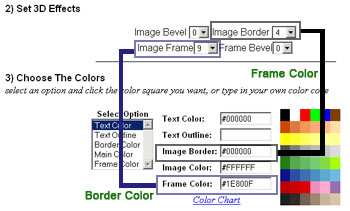
To select 3D Effects:
click on the drop down arrows next to the boxes with the numbers
and pick a number. Remember: Just because you can use these
options, does not mean you should. Be careful not go overboard
with your new tools.
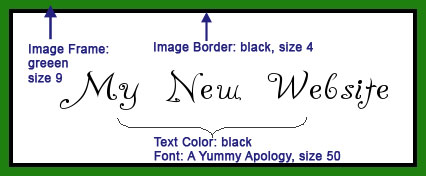
To select Colors: click on
the Text Color under Select Option, go over to the color chart
and pick a color. Once you pick a color, you will see the
hexadecimal code pop up in the box next to Text Color. In the
example above you see #000000, which is the hexadecimal code for
black.
Note that here, text outline
was not selected because using a text outline on a thin
font such as My Yummy Apology makes the font disappear. If you
put in a color for text outline here, to see your text outline,
select the size of the text outline in Step 4. A text outline
looks good with thick fonts such as Arial Black.
If you would like more color choices, click
on the Color Chart link. In the chart, you can find the right
colors for you. The chart will provide you with the hexadecimal
code. Highlight and copy the code. Click on the back button on
your browser to get back to this window and paste in the code in
the appropriate box. Make sure that you have the
pound symbol (#) in front of the color code.
The selections above (with Make a New Image
with a New Size selected, size: 400 x 150) result in the
following image:
Modify the selections above slightly:
keeping everything the same but changing Image Bevel to 2 and
Frame Bevel to 4 result in the following image:
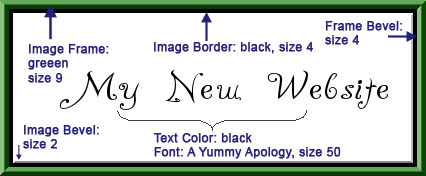
You should play around with the settings to
get the look you want.
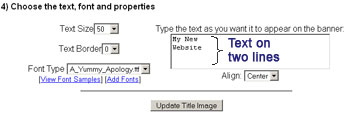
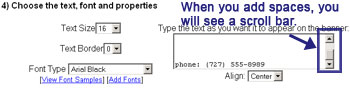
STEP 4: Choose the Text, Font
and Properties
This is the final step. Select your Text
Size, Text Border and your Font Type. To make your selection,
click on the little drop down arrow next to each option. If you
need additional fonts, click on the Add Fonts which will direct
you to the font gallery.
Once you make your selections, then type
the text as you want it to appear on your banner. If you want the
text to appear on one line (as you saw with the examples above),
then you should type the text on one line. If you want the text
to appear on two lines, then you should type it on two lines as
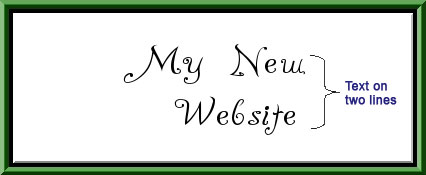
you can see below.
The selections above result in the
following image:
If you want to add your phone
number or e-mail address below the current text:
- Create your original image.
- Select Customize the Current
Titlespace Image.
- If you have any 3D effects, make sure
that you change them all to zero because the system will
readd them to your image.
- Scroll down to Step 4 and delete any
of the text that is currently in the Type the text as you
want it to appear banner. Click in the box and then press
the enter key on your keyboard a few times to move your
cursor down. You will need to estimate the amount of
spaces you will need to get below the text you already
have on the banner. You should also select a smaller Text
Size and maybe a different font.
If you do this wrong, you may see something
like this:

Note the double border
because the Image 3D effects were not changed and the phone
number on top of the other text because there were not enough
spaces entered. If you make a mistake, you must start from the
beginning. That is, you must start by remaking the My New Website
part.
If you do this correctly, you may see
something like this:

To see your title space, click on the
Website Home icon at the top. This will take you the home page of
your website. If you cannot see the changes you made, make sure
you refresh your page.
|